First look: XenApp and XenDesktop 7.5 – part seven (HA & load balancing changes)
This is part seven of a series looking at XenApp 7.5 & 7.6.
Part one – What’s new, and installation
Part two – Configuring the first site
Part three – Preparing my XenApp template image
Part Four – Creating the machine catalog to give me a hosting platform
Part five – Creating the delivery group to publish apps and desktops to user
Part six – new policy filtering options available
For those familiar with the way Load Balancing works in XenApp 6.5, the changes in 7.5 are quite radical.
Gone are the load balancing policies one is used to. Also gone are the worker groups that we used to silo servers, for both application and server grouping, and to perform server fail-over between sites. Gone is the ability to have single global farms, and use zones to segregate our servers into data-centre sized groups with the ability to fail over one region to another.
Some of the topics raised in this post form part of a talk I’m giving at GeekSpeak Tonight at Synergy LA. If you’re a follower of the blog or follow me on twitter do stop and say hi!
Everything has changed. And not all in a good way. Let’s dig deeper
The demise of the zone
Probably the biggest change on moving to the FMA architecture, certainly for larger organisations, is the loss of the zone. This allowed a single 6.5 farm to span multiple sites or even continents, with servers being logically grouped into a zone representing a physical data centre. In the FMA world, there is no real zone replacement. You need an individual XenApp site for every former IMA zone and then use StoreFront to aggregate or fail over applications being delivered from each site. Given a XenApp site under FMA requires at least two SQL servers and two Delivery Controllers (for HA) then that’s a lot of new infrastructure you need to deploy to achieve the same functionality if you are replacing a single 6.5 farm that has many zones. This is the biggest reason I see many larger organisations not making the move to the 7.5 FMA architecture.
You can of course stretch a single XenApp 7.5 site across more than one data centre, but only if you have multiple, redundant, low latency connections between them. Unfortunately Citrix doesn’t specify what latency is sufficient – you’ll have to do your own testing to determine that. Remember a reliable connection between the delivery controllers and your database is key for correct operation of the environment. No more local host cache to fall back on until the next release of XenApp.
There’s more bad news I’m afraid..to configure StoreFront to provide this consolidation, load balancing and fail-over functionality you used to get from within the AppCentre console in 6.5, you now need to manually edit the XML configuration files on each StoreFront server. Arggh #1.
I’m not going to cover setting this up here as the process is documented in eDocs and in a Citrix blog post (plus there are a number of community blog posts discussing it)
Whilst StoreFront HA and LB presents some powerful fail-over and load balancing features, some of which weren’t available in Web Interface, having to configure them in the XML configuration file is a step back from being able to define load balancing and fail-over groups in the old AppCentre console.
The demise of the worker group
Under XenApp 6.5, inside an IMA zone one could further segregate servers into logical groups using worker groups. These could be used to control application publishing, policy application, load balancing and fail-over. Under 7.5 FMA, there is no concept of a worker group – the closest alternative is the delivery group.
A delivery group is used to publish a defined set of applications (or a desktop) available on a defined machine catalog (or several catalogs) . So to define a logical group of servers, and to assign them to users in a controlled and meaningful way (i.e. with some kind of preference for fail-over) , you’ll need two machine catalogs that define the primary and failover servers and two delivery groups that define the users and the fail-over preference.
Note each catalog can utilise the same master image or template so you don’t need to maintain multiple images to use multiple catalogs and delivery groups.
The demise of load balancing preference policy
There is no concept of a load balancing policy any more (not to be confused with a load management policy which determine how server load is calculated), which means you also lose the ability to assign preferences in the load balancing order. You will need to assign your delivery group to multiple machine catalogs and assign them priorities to achieve equivalent functionality.
Now, here’s another “feature” you don’t want to hear – it’s impossible to configure a published application to load-balance or fail-over across delivery groups using the Studio console. Arghh #2.
Remember that the Studio console is really just a GUI to the XenApp PowerShell API, and not all the functionality available in FMA is exposed through the console. Load balancing XenApp published applications (second nature to most of us from 6.5) is one of those items.
Let’s take a look at how to configure application load-balancing and fail-over in XenApp 7.5. Remember, this is all intra-site fail-over – you need to use StoreFront if you want to fail-over between two or more separate sites.
Load balance only
Objective: Spread user load across multiple machine catalogs using a single delivery group
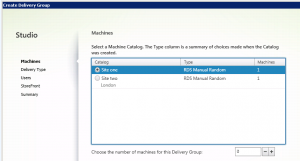
When you create a new delivery group in the Studio console, you can only assign a single machine catalog, even if you have multiple machine catalogs available:
The catalog selection dialog in the GUI prevents you from assigning machines from more than one machine catalog. To provide applications from multiple catalogs to the same delivery group (i.e. load balance) using the GUI you first need to create the delivery group with machines from one catalog, then choose the “Add machines” option, and then choose your alternative catalog and add machines from that.
Note this is purely a limitation of the console – you can see this by examining the PowerShell the console generates when you create a delivery group: (note:simplified for readability)
[code language=”powershell”]New-BrokerDesktopGroup -ColorDepth ‘TwentyFourBit’ -DeliveryType ‘DesktopsAndApps’ -DesktopKind ‘Shared’ -InMaintenanceMode $False -IsRemotePC $False -MinimumFunctionalLevel ‘L7’ -Name ‘Primary’ -PublishedName ‘Primary’ -SessionSupport ‘MultiSession’
Add-BrokerMachinesToDesktopGroup -Catalog ‘Site one’ -Count 5 -DesktopGroup ‘Primary'[/code]
So it actually creates an empty delivery group, then adds servers from your primary catalog to it. Of course, performing the “Add machines” just calls the same “Add-BrokerMachinesToDesktopGroup” command specifying the same desktop group but your second machine catalog.
[code language=”powershell”]Add-BrokerMachinesToDesktopGroup -Catalog ‘Site two’ -Count 5 -DesktopGroup ‘Primary'[/code]
Note: you can’t assign any kind of priority to the machines and catalogs assigned to your delivery group – this method provides load balancing only, with no preference or fail-over facility.
Fail-over
Objective: automatic fail-over from a primary set of machines to a secondary set if the primary is unavailable
Because assigning multiple catalogs to a delivery group above does not allow any kind of preference or priority to be set, we need to utilise a second delivery group if we want to provide fail-over with preference.
First create a primary delivery group, and assign machines from your primary machine catalog only.
Create a secondary delivery group, and assign machines from your secondary machine catalog only.
We now have two delivery groups, assigned to two machine catalogs.
We can now publish the application, but here we hit another restriction of the GUI – you can only publish applications to a single delivery group. Arghh #3.
If you try and publish the same application to another delivery group using Studio, you end up with a copy! (e.g. Notepad and Notepad_1) and users receive two icons – not what we want. We’re going to need to drop into PowerShell to achieve what we want.
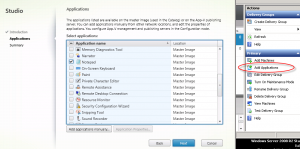
Let’s publish Notepad to our first delivery group. Select the primary delivery group in Studio, then choose “Add application”. We’re going to use our trusty friend Notepad for this example. Choose Notepad from the list (or add it manually if there is no running server available to query) and finish the Add application wizard.
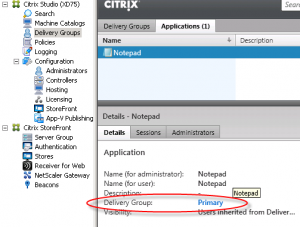
We can see from Studio that the Notepad application is now available on our Primary delivery group.
But nowhere in the console is there a way to assign this application to any other delivery groups!
If we examine the PowerShell that the console generated (simplified for readability) when creating the published application, we spot something interesting:
[code language=”powershell”]New-BrokerApplication -Name ‘Notepad’ -ApplicationType ‘HostedOnDesktop’ -CommandLineExecutable ‘C:\Windows\system32\notepad.exe’ -CpuPriorityLevel ‘Normal’ -DesktopGroup "Primary" -Priority 0 -PublishedName ‘Notepad'[/code]
There is a priority assigned! (defaults to zero).
To assign our existing Notepad published application to another delivery group, we need to issue the PowerShell command:
[code language=”powershell”]Add-BrokerApplication -Name "Notepad" -DesktopGroup "Secondary" -Priority 2[/code]
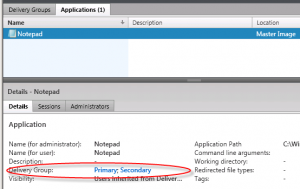
Note if you use the same priority your sessions will load-balance equally between the two delivery groups, and fail over if either one has no machines available. In this case we’ve used a lower priory for the second delivery group, so that our secondary group of servers will only be utilised if there are none from our primary group available. This is the new output from the console:
We can see that the application is available on both delivery groups – we’ve successfully load balanced our app within the same site!
You can easily test this by placing your primary delivery group into maintenance mode and checking you can still launch your published application, and check that the session is directed onto a server that’s in your secondary machine catalog.
Leave a comment
You must be logged in to post a comment.


