As announced last month, Citrix have now released their latest versions of XenApp and XenDesktop – version 7.5.
This is the first in a series of blog posts looking at the new version.
Part one (this post) – What’s new, and installation
Part two – Configuring the first site
Part three – Preparing my XenApp template image
Part four – Creating the machine catalog to give me a hosting platform
Part five – Creating the delivery group to publish apps and desktops to user
Part six – New policy filtering options
Part seven – Load balancing and fail-over changes
As many of my readers will know, I tend to switch to the full Java console when I know I’m going to be doing alot of work in the Netscaler console as it’s much faster than the HTML version.
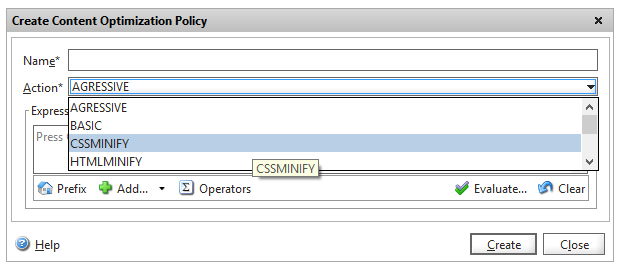
I recently noticed a new item that had appeared in the Java GUI labelled “Content Optimization”
Intriguingly this doesn’t appear in the native HTML GUI anywhere!
On investigation, it appears I can now create policies to perform various in-line optimisations in HTML content such as MINIFY. I’ve yet to find any way of binding them to vServers though!
The complete list of available Actions are: Agressive [sp], Basic, CSSMinify, HTMLMinify, IMGopimize, JSMinify, Moderate, None
This is hopefully a feature that’s due to appear in the next major release – although looks like it was added a little too early in the Java GUI!
This is great news – I’ve been after this functionality for a while, as the Netscaler is ideally placed in-line with your web site to perform these optimisations on the fly and already has a powerful packet processing engine to efficiently rewrite content.
Google are actively developing a PageSpeed module for a variety of popular web servers like Apache that performs similar features (and a whole host of others). Given there is a PageSpeed SDK available it would awesome of more of this functionality were to be ported onto the Netscaler platform. Google also offer a hosted service, currently free, that provide the same in-line optimisations for your site.
When working on Netscaler implementation projects, most of which tend to be internet-facing, one aspect that most organisations always perform is a penetration test. Having been through a number of these over the years, I thought it would be a good idea to share my experiences and some of the common aspects that get highlighted, to enable you to “pass first time” without having any remedial actions to work through and costly re-tests to perform.
A good place to start is to work through the “Securing Netscaler” Citrix white paper available here (PDF).
I’ve worked with Netscaler, and Netscaler Gateway (formerly Access Gateway Enterprise Edition) for a number of years now, and whilst I’m a huge fan of the technology, over that time I’ve built up a number of “I wish it did this” items. Some are the results of things I’ve found, whilst others have been requested by end users.
I though it was time to put them down on paper (well, in electronic format at least), share with the world and get some feedback and hopefully visibility.
Update: 31/12/13 – the original title of this blog was “Top 5 feature requests” but I’ve added a couple more since.
In no particular order…
I love writing these kinds of posts – real world examples of troubleshoot live environments, and sharing the methodology I used to find the root cause. As with all of my posts, click on the screenshots to enlarge.
[updated on 11/10/13 to add an additional caveat when using the GC for multi-domain authentication]
I was asked to investigate a “Cannot complete your request” error which was preventing users from logging into their StoreFront site externally via a Netscaler Gateway.
As usual, the error message wasn’t particularly helpful or descriptive, so we’re going to have to do some elimination. This is how I found and fixed the error.


